

Getting started with your Bambuser demo account
Thanks for signing up for a demo account. It’s great to have you on board!
To make your first experience as smooth and as beneficial as possible, on this page we have gathered all the information you need to get you started with Bambuser.
The details of your demo account
- Your demo account is valid for three days (72 hours)
- Streams: up to 10 minutes each and the player is watermarked
In this guide
Set up your account
The Bambuser dashboard is the administration hub of your Bambuser account. There are three parts to the dashboard:
- The Shows tab is where you manage your upcoming, scheduled, and ended shows.
- The Stats tab is where you can see past shows' results, including the number of viewers and the number of products added to cart.
- The Settings tab is where you manage your Bambuser settings, including adding/removing users and managing your profile.
When you log in to the Bambuser dashboard, you will be taken to the Shows tab.
Setting up your profile
In the Settings tab, under Profile, you can manage your:
- Name
- Profile picture
- Password
Your name and profile picture will appear if you are moderating the chat.
Adding and removing users
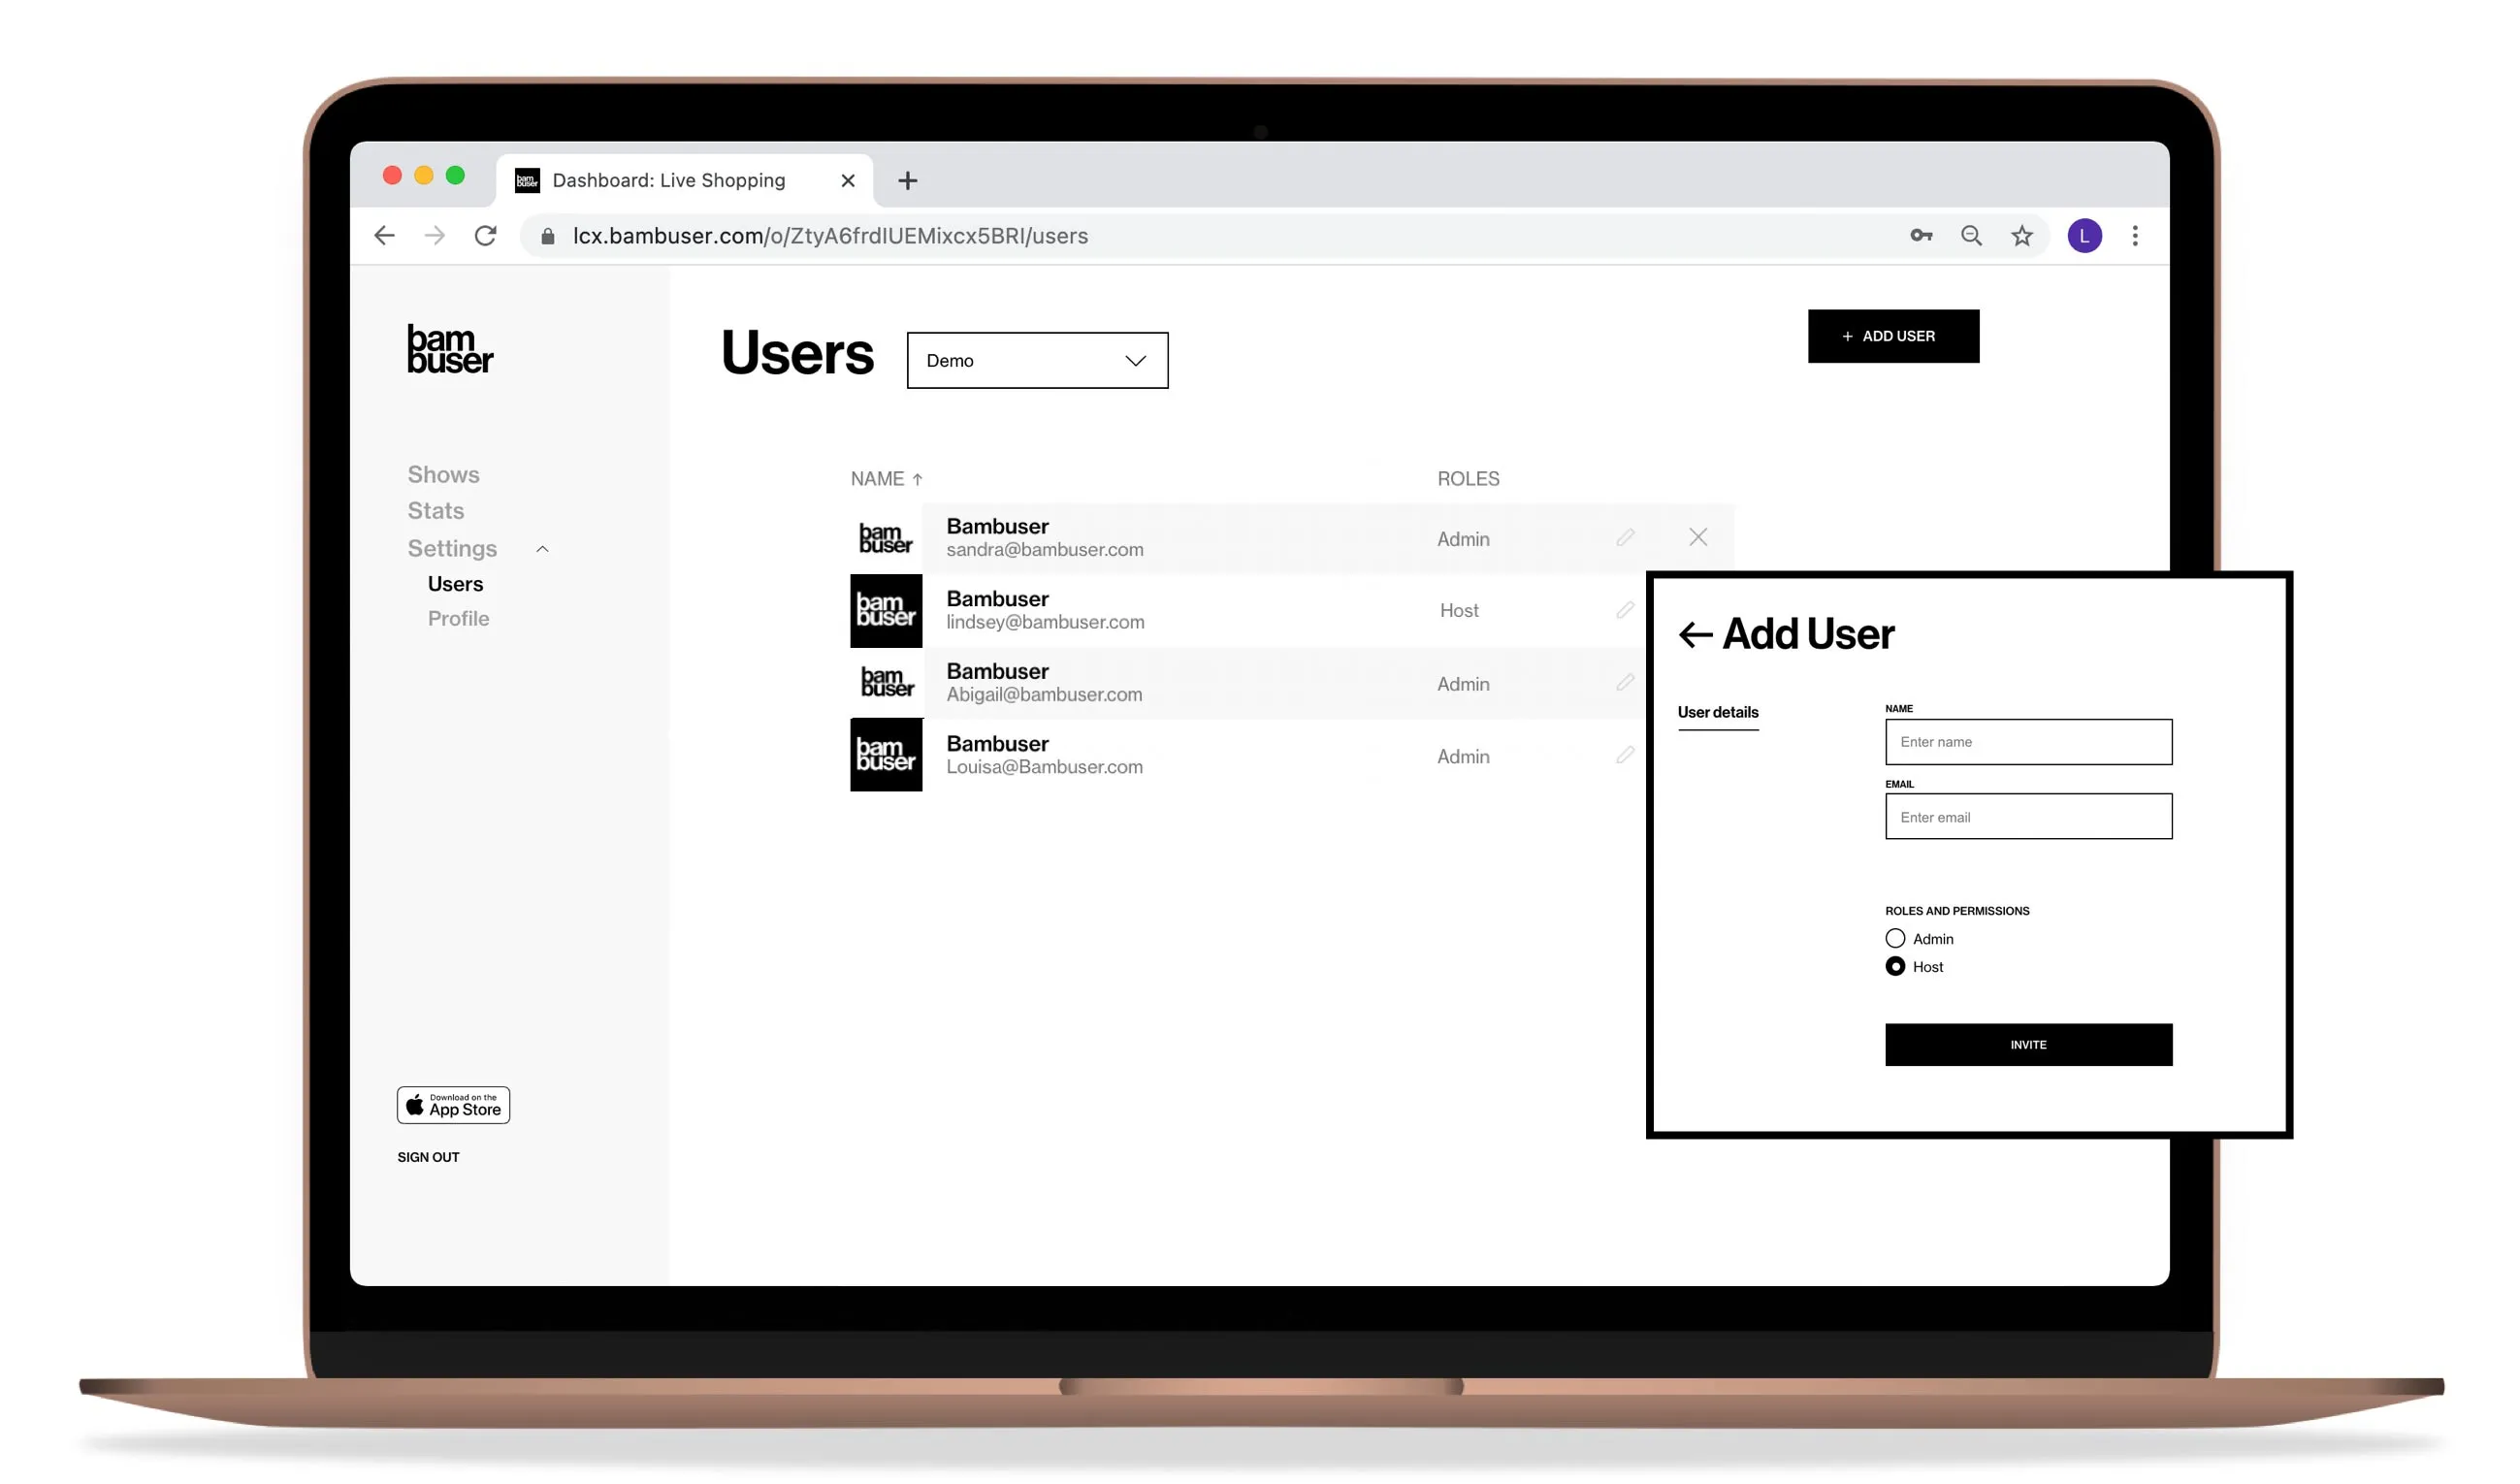
In the Settings tab, under Users, you can manage your team.
To add a new user, click Add User and enter their name and email. Assign them to be either:
- Admin: Permission to access the dashboard, create and moderate shows, and see all show information. Admins can also be assigned to host shows.
- Host: Access to the broadcasting app only. Hosts have access to the features needed to shoot and host shows, but not admin functions like adding/removing users or adding products. They are used often for outside partners or influencers.
Click Invite to send a welcome email to your new user(s).
Create a show
- From the Bambuser dashboard, click the +CREATE A SHOW button
- Assign a host
- Add products
- Embed the player code on your website
- Start broadcasting from the Bambuser app
When you're ready to get started, go to the Bambuser dashboard and click the +CREATE A SHOW button in the top-right corner. From there, you'll be taken to the Setup screen. Enter the title of your show in the TITLE field. Keep the tag short: it will only display the first 60 characters (including spaces).
Next, choose the date and time for your show. Click in the TIMEZONE field to set the timezone for your live stream, and then click on the SHOWTIME field to choose your show's date and time.
Assign a host
Click on the HOST field to see a drop-down list of all your available hosts. Hosts are people who have been assigned either Admin or Host in your Bambuser account. By default, the person creating the show (you) will also be set as the host. When a host is assigned to a show, they will receive a notification from the Bambuser app.
Add products
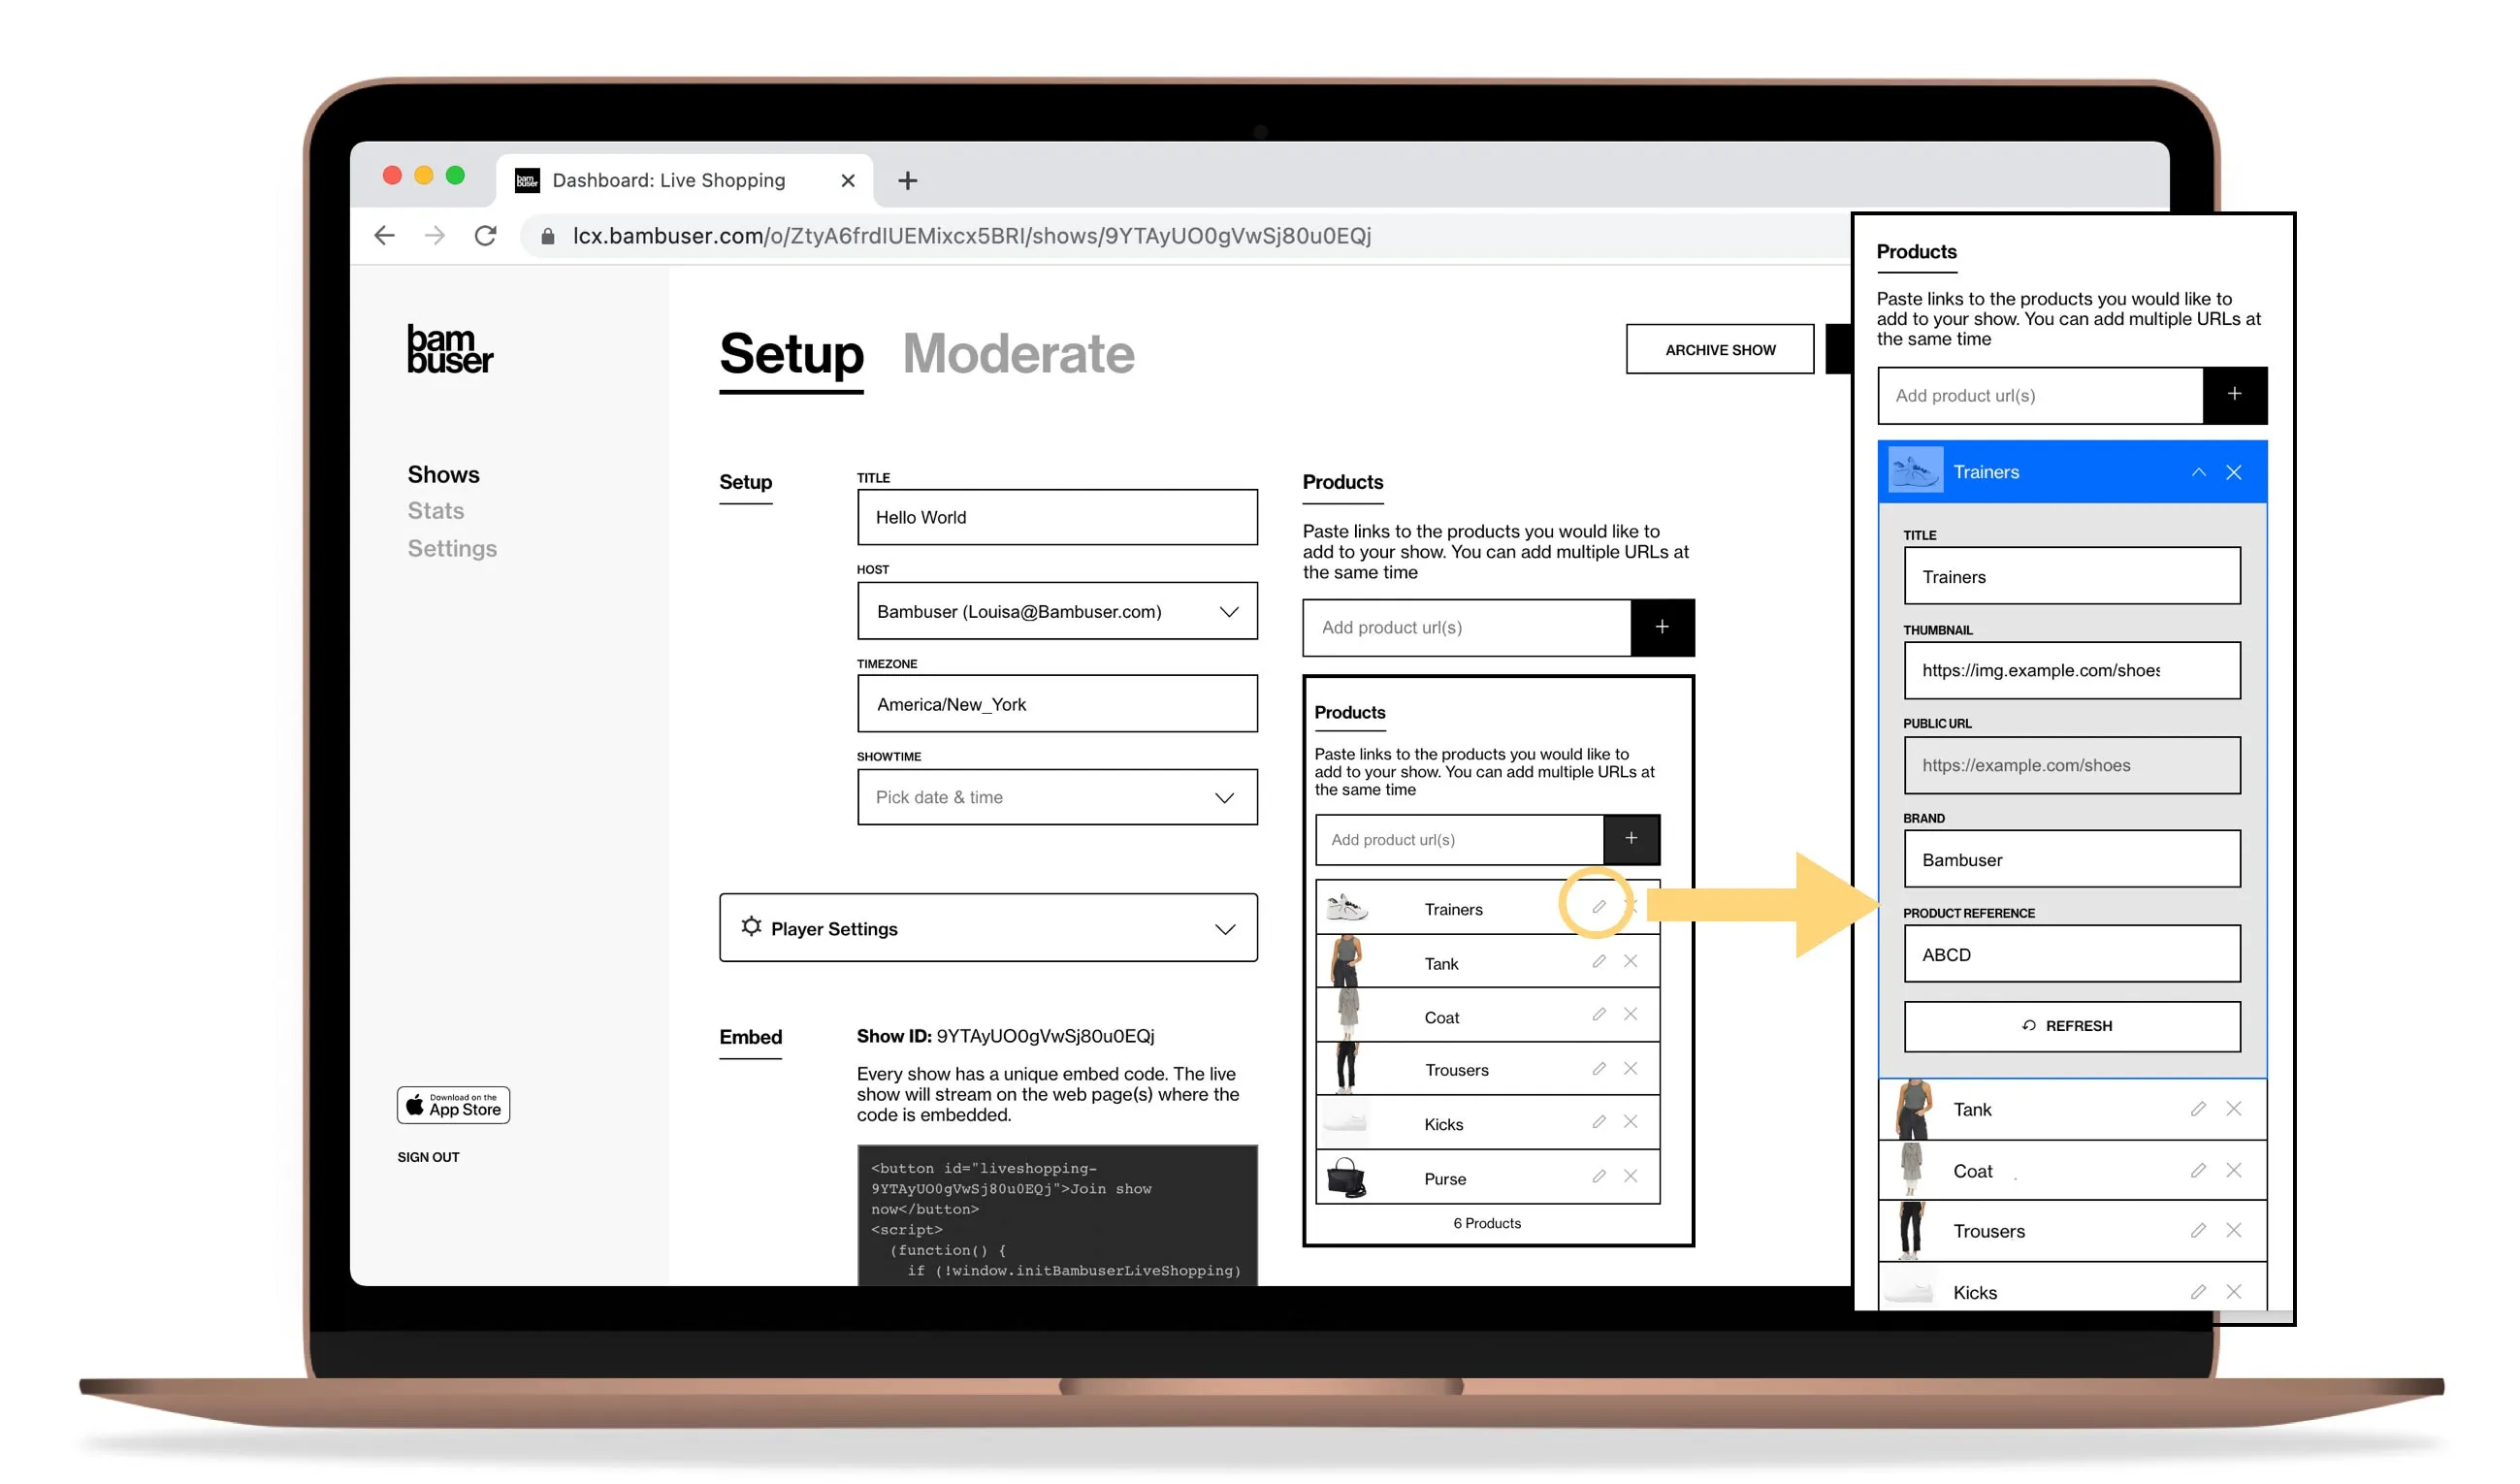
On the right-hand side of the Setup section is the Products area.
To add a product:
- Go to your website and copy the URL of the product page
- Paste the URL into the Add product URL(s) field
- Click the plus (+) icon or press the enter/return key on your keyboard
Bambuser will take the product data from your ecommerce site and use it to populate the product listing. This includes:
- A thumbnail image URL
- A product name or title
- A brand name
- A reference value (often the SKU, or if it does not exist, the product URL)
To scrape product information, we look for schema.org/Product data schema as well as og: meta tags.
Once the product is added, click on the pencil icon to open the product listing. You can edit the product information, if needed, here.
The order of the products in the dashboard is the same order that the products will be displayed in the live stream. If you want to change the product order, click and drag. You can add as many products as you wish to your show, but viewers can see all the products on the list.
To remove a product from a show, click on the X in the product listing.
Embed the player code on your website
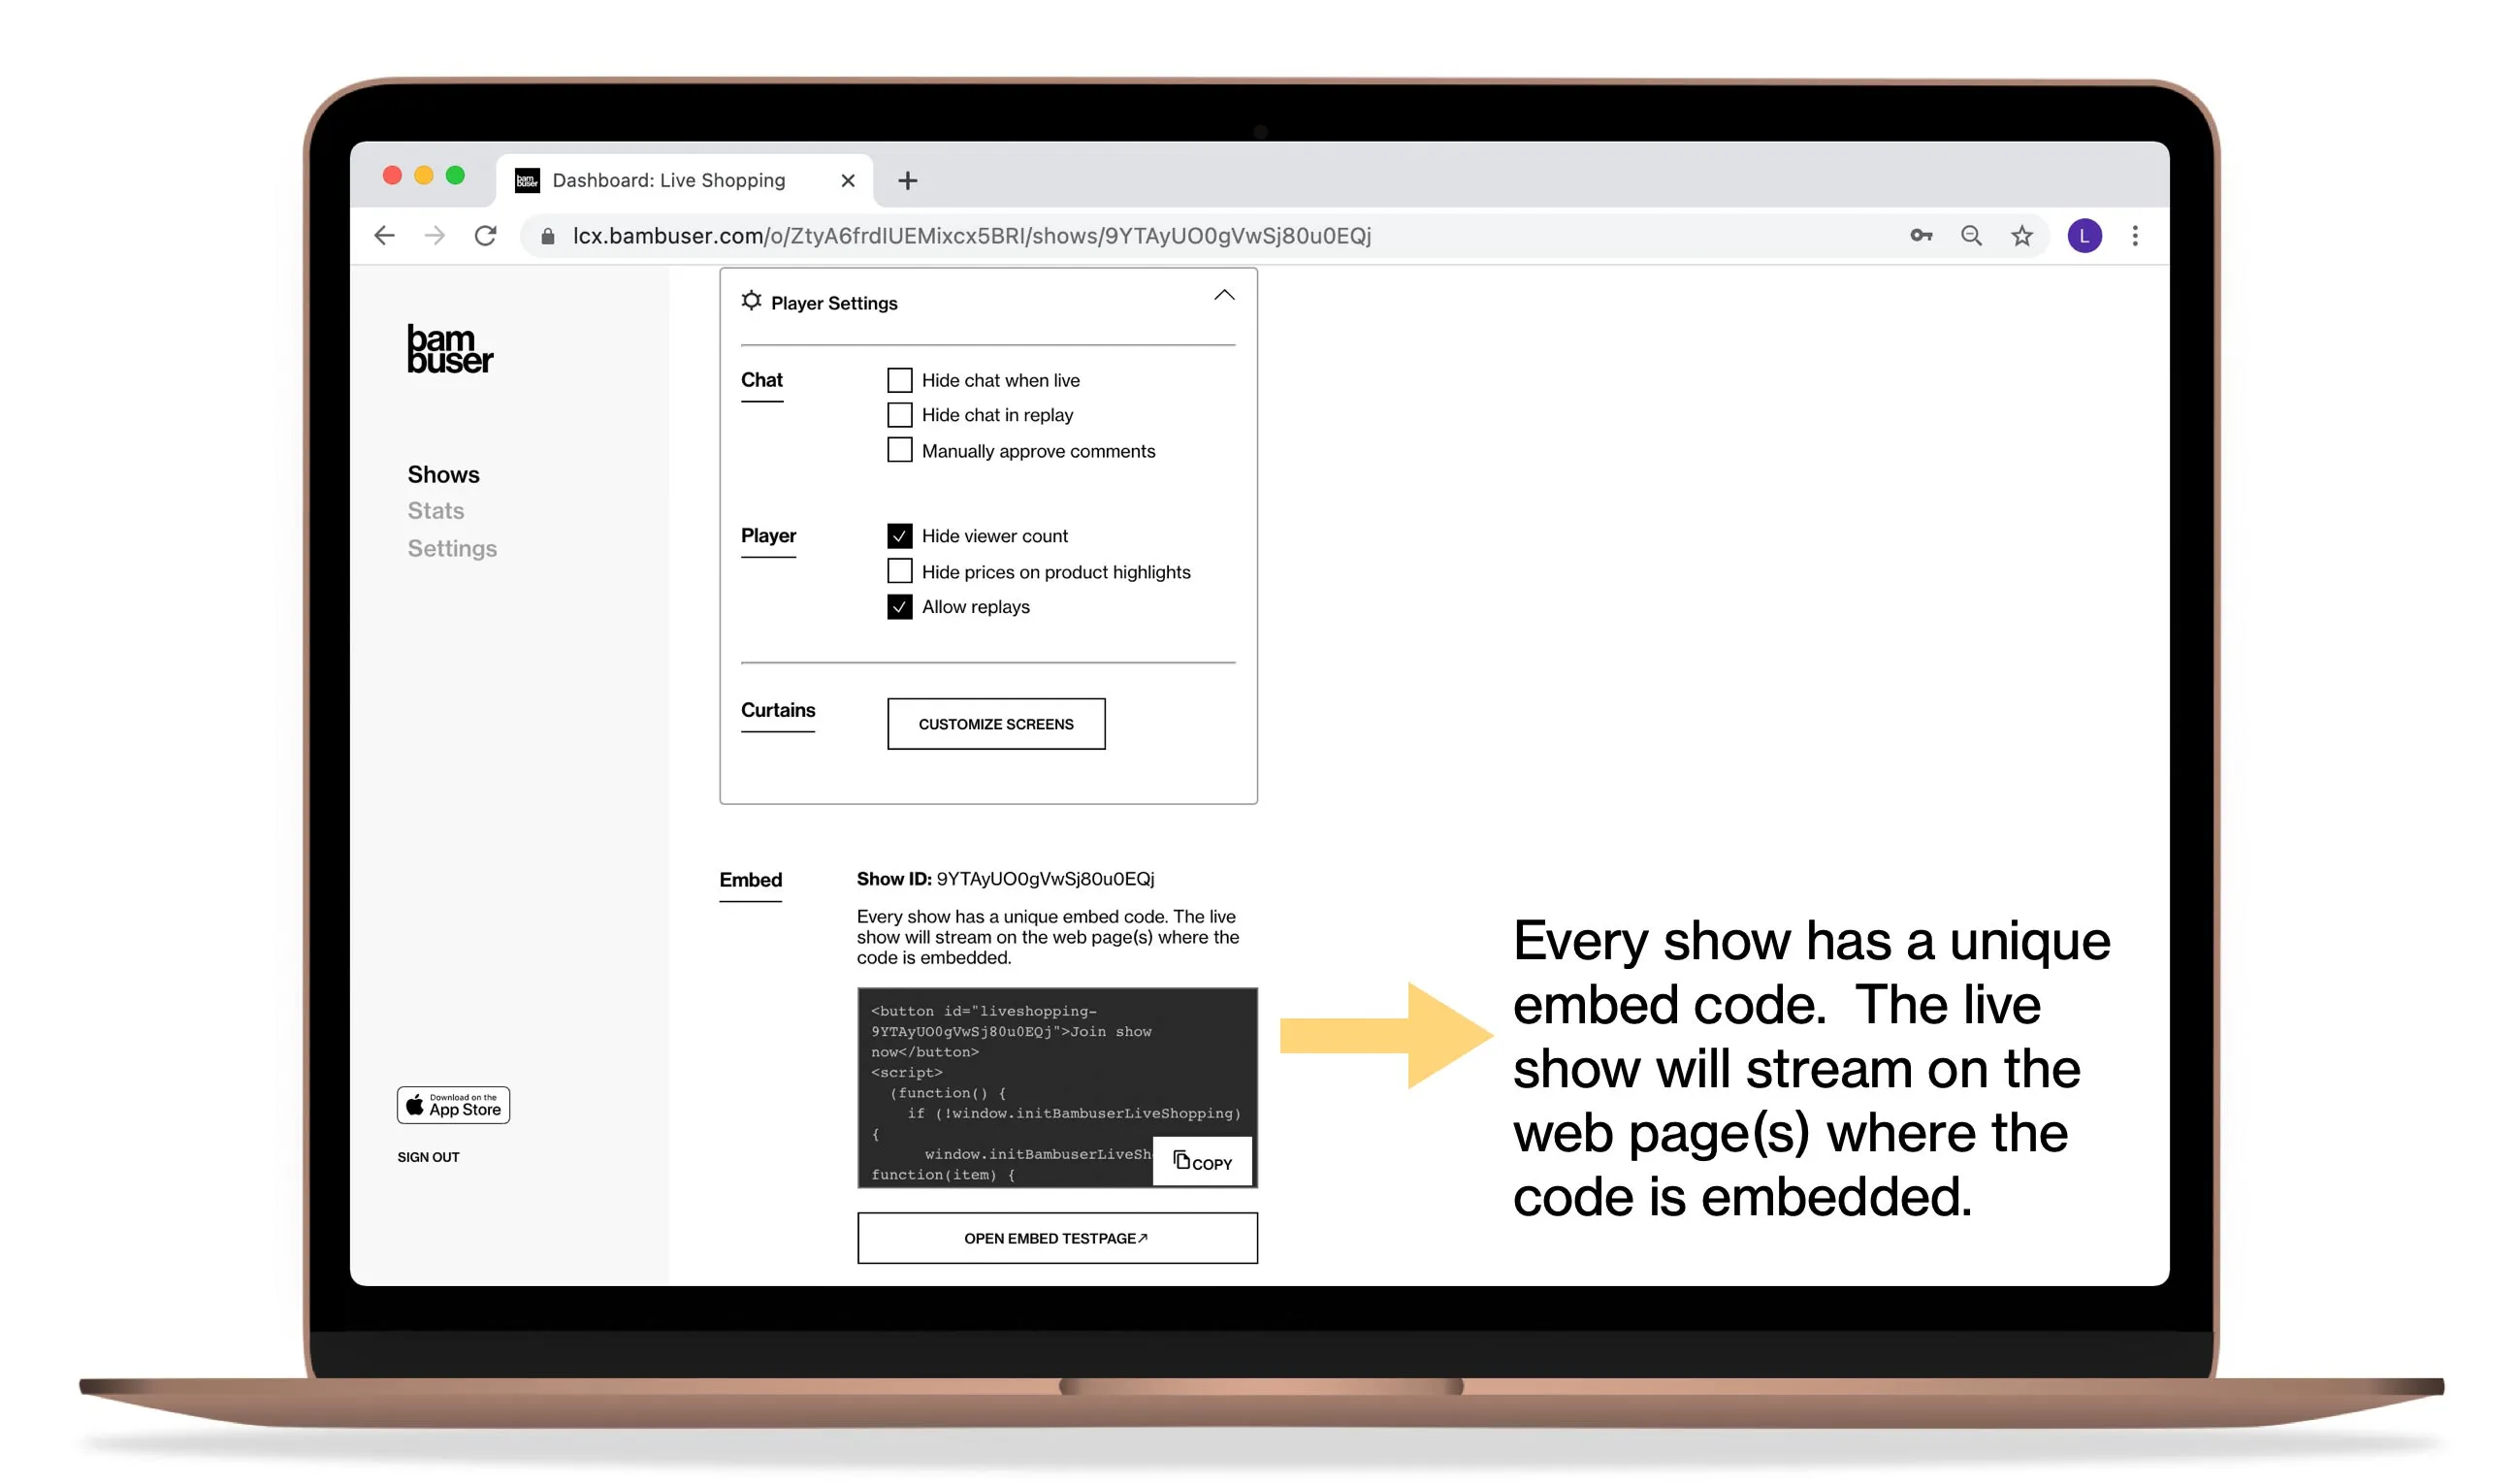
On your show page, press the Copy button in the Embed part of the show's Setup page. This copies the show's unique embed code, which can then be inserted on any page where you want to show the player.
You can embed the Bambuser player on any website, but if you want Bambuser's add-to-cart functionality to work with your ecommerce site, it's best to have the player and the products on the same site.
Using a test page
To see what the player or show looks like before you embed it on your website, you can create a test page.
To create a test page:
- In the Bambuser dashboard, click on the show you want to test.
- From the Setup screen, scroll down to the bottom of the page. Click the OPEN EMBED TEST PAGE button.
- This will open a separate, blank page with a button that says Join LIVE show!
- Click the button to open the player.
Now you can see the player — and your live stream — as the viewers would see it, which can be helpful when practicing or rehearsing shows. You can send team members a link to the test page to watch the rehearsal as a viewer would.
NOTE: Because the test page isn't on your website, you won't be able to test functionality such as clicking on products or adding to cart.
Start broadcasting
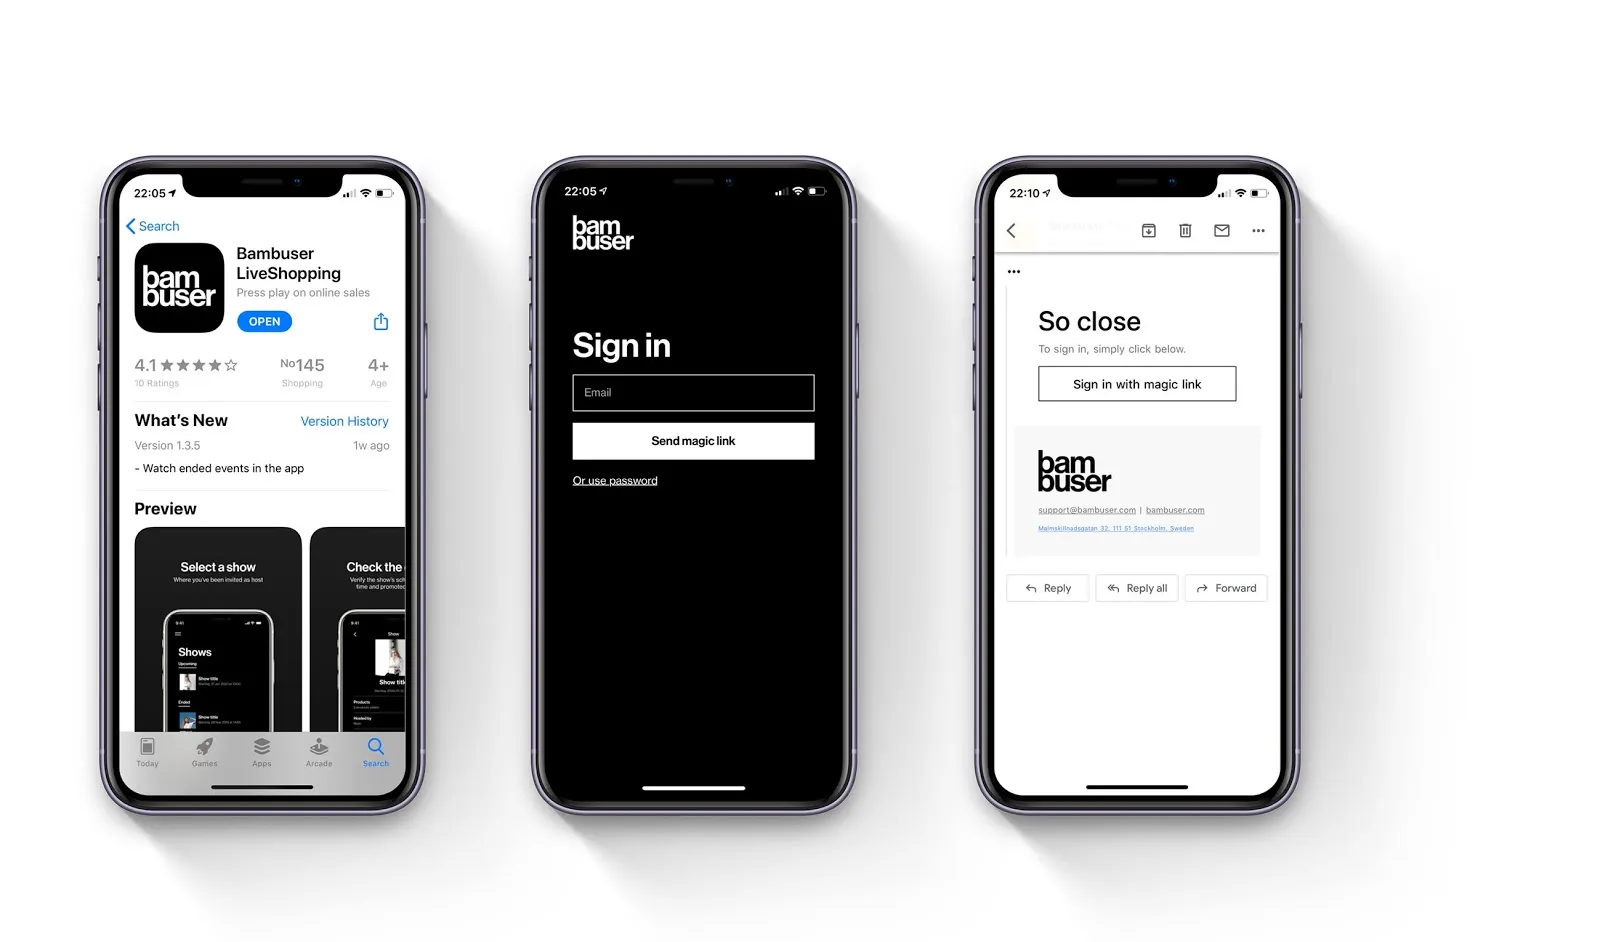
To host a show, you will need the Bambuser mobile app. The app is free to download and use.
You film and broadcast your live streams with the Bambuser app. In the app, you'll have access to the shows where you've been assigned as a host, but you won't be able to see other shows the company has done.
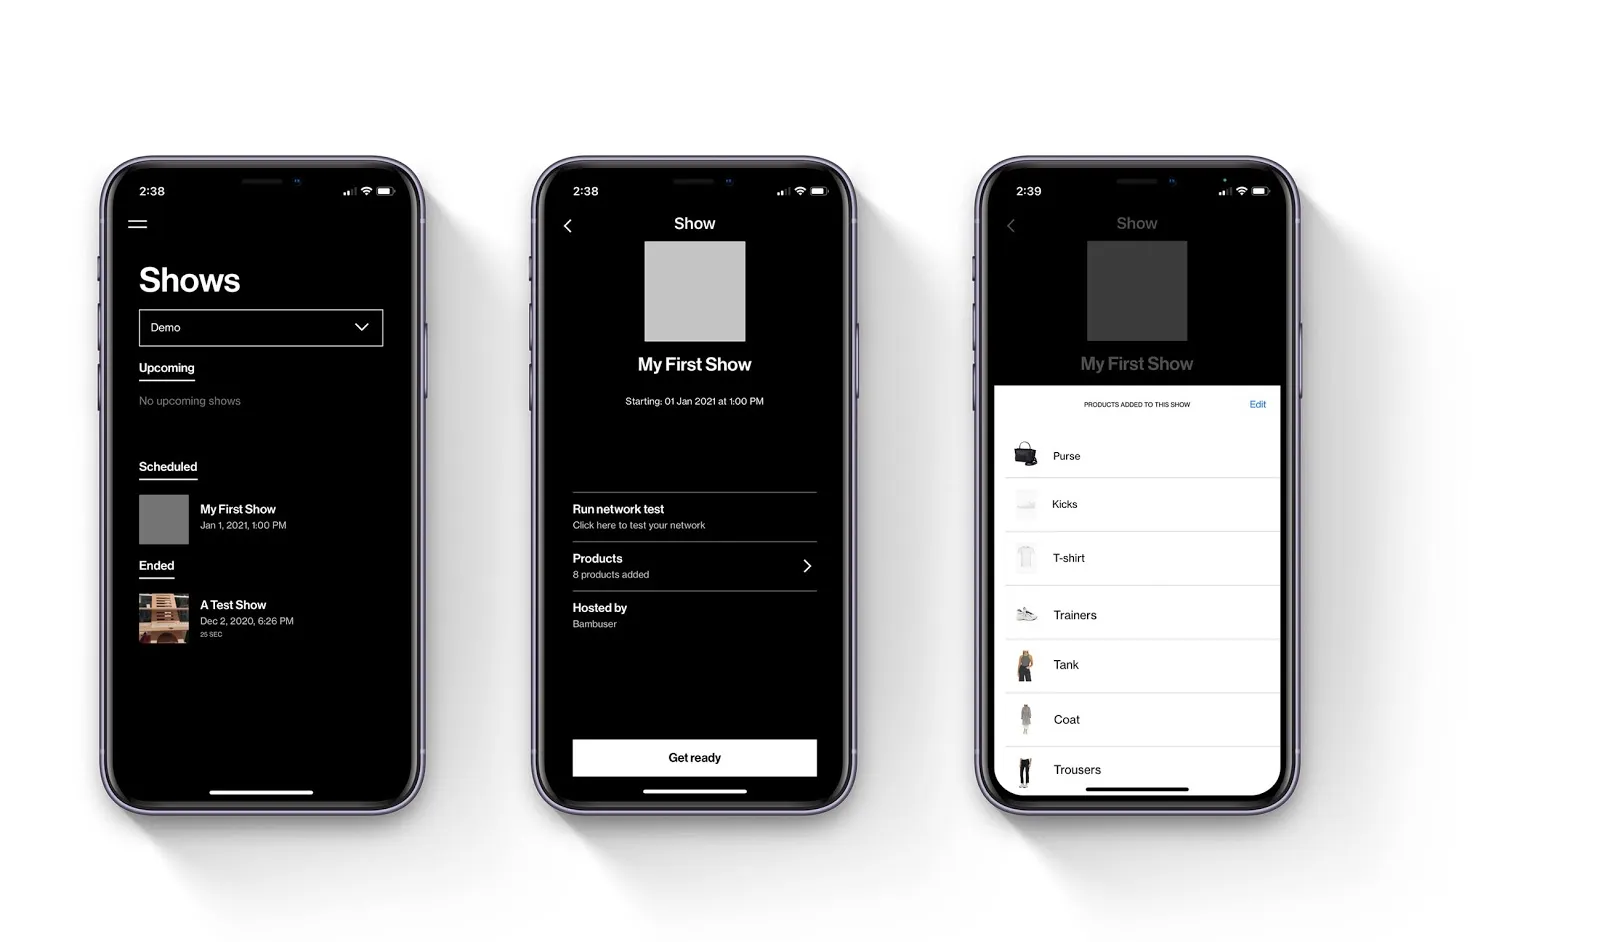
Once you log in to the Bambuser app, you'll be taken to the Shows screen. Here you'll see a list of Upcoming, Scheduled, and Ended shows where you've been assigned as the host.
To start broadcasting, all you have to do is:
- Select the show you're going to host from either Scheduled or Upcoming shows.
- If you're doing a Scheduled show, verify that the title and start time are correct.
- Tap on the show.
On the next screen, you'll have three options:
- Run network test
- Products
- Get ready
Run network test
A high-quality live stream needs a good upload speed. So before you go live, test your network.
Tap Run Network Test in the Bambuser app to quickly test your network strength before going live.
NOTE: The video quality of the live stream will depend on your network. A bad network will produce a low-quality video transmission. In general, aim for an upload speed of around 10 Mbps.
Products
As a host, you can review the list of products in a show before the show goes live and remove products from the list as needed. You also can highlight products while the live stream is in progress.
NOTE: You can only add new products through the dashboard. We recommend that you have someone off-camera manage the product list from the dashboard.
To review the product list in the app, tap on Products. You'll see a list of products with their names.
To remove a product, tap Edit at the top of the list, then tap the remove icon.
Get ready
Once everything is ready to go, tap the Get ready button at the bottom of the screen. This will open your camera and show you what the stream will look like before you go live.
Tapping the Get ready button does not trigger a broadcast so that you can check the positioning of the host, products, and all other elements on the screen at this stage.
To get out of preview mode, click the back arrow button at the screen's top-left corner.
If everything looks good, tap the Go Live! button. You'll get a 3-second countdown before the stream officially starts.
While live, you can:
- Reverse your camera
- Check the voice level (iOS only)
- Tap on an object to change the exposure (iOS only)
- Highlight one or more products from the product list
- See and respond to chat messages
To end the broadcast, tap the End show button at the top-right corner of the screen, then press End Live Show.
Manage chat and products
Chat moderation
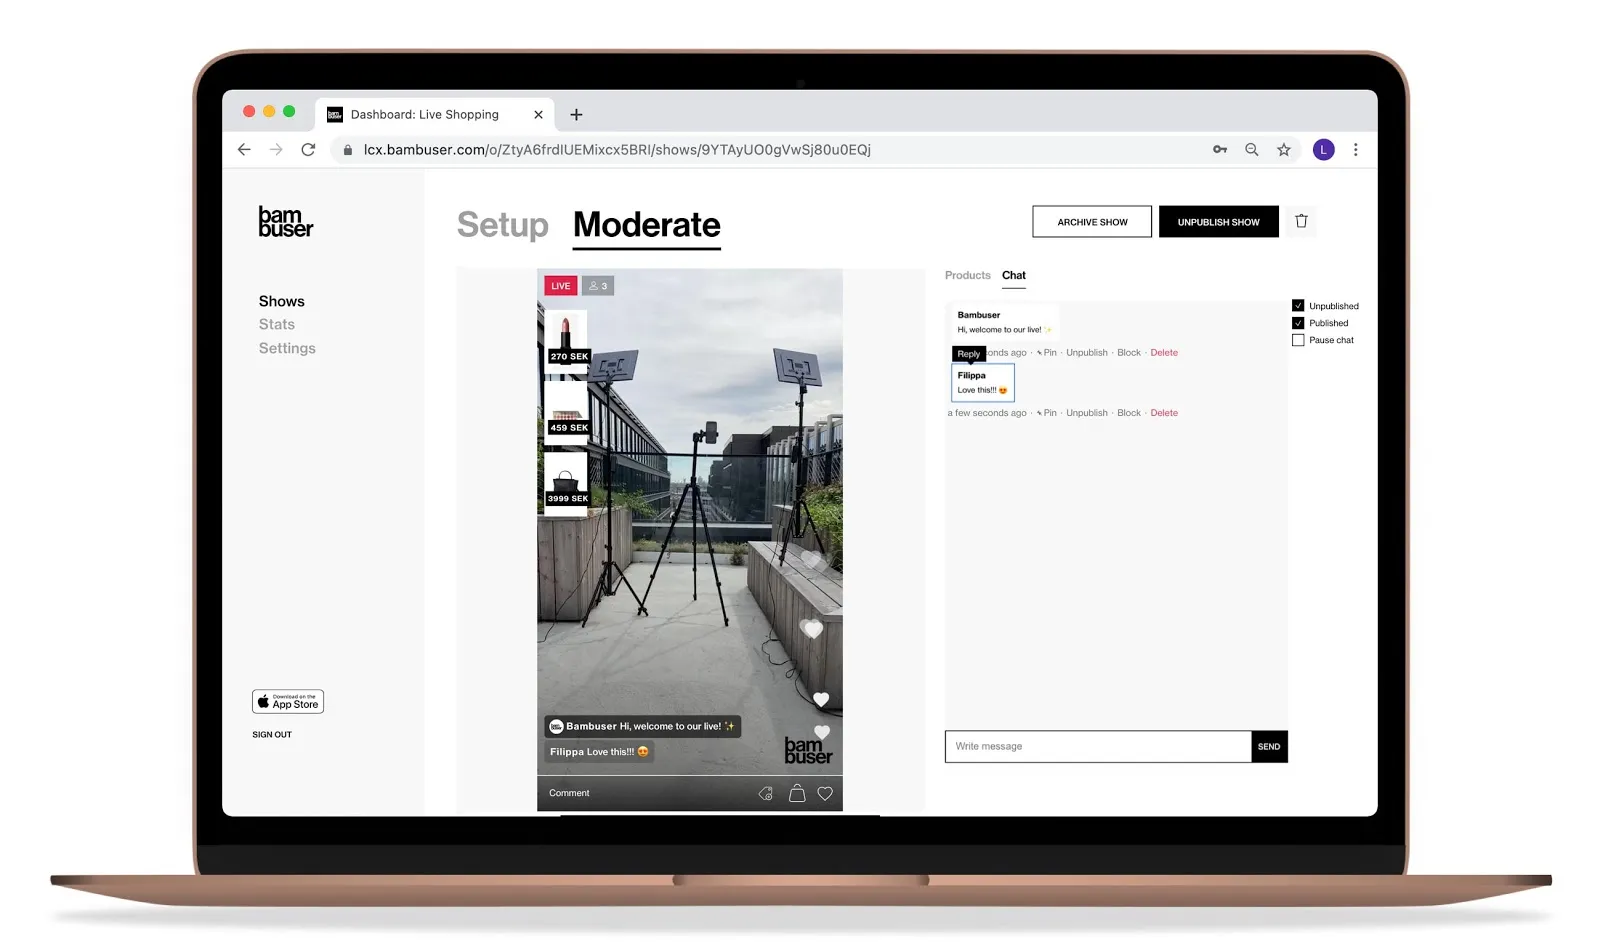
You can find all the chat moderation tools under the Chat tab in the Bambuser dashboard. Just select the Moderate tab on top and the Chat tab on the right (next to Products). Hosts can also post new comments and unpin pinned comments through the Bambuser app.
Moderator chat messages look slightly different than regular chat messages. This is to let viewers know that the message comes from you and not just from another viewer.
To send a message in the chat, type your message in the chat window, then hit the Enter key or click the SEND button. Your message will appear in a few seconds.
It's best to stick with plain-text messages in the chat. But if you do need to send a link, you can. Just add https:// in front of the URL.
NOTE: Only links sent by moderators are clickable. Links sent by regular viewers will not be clickable.
Product highlights
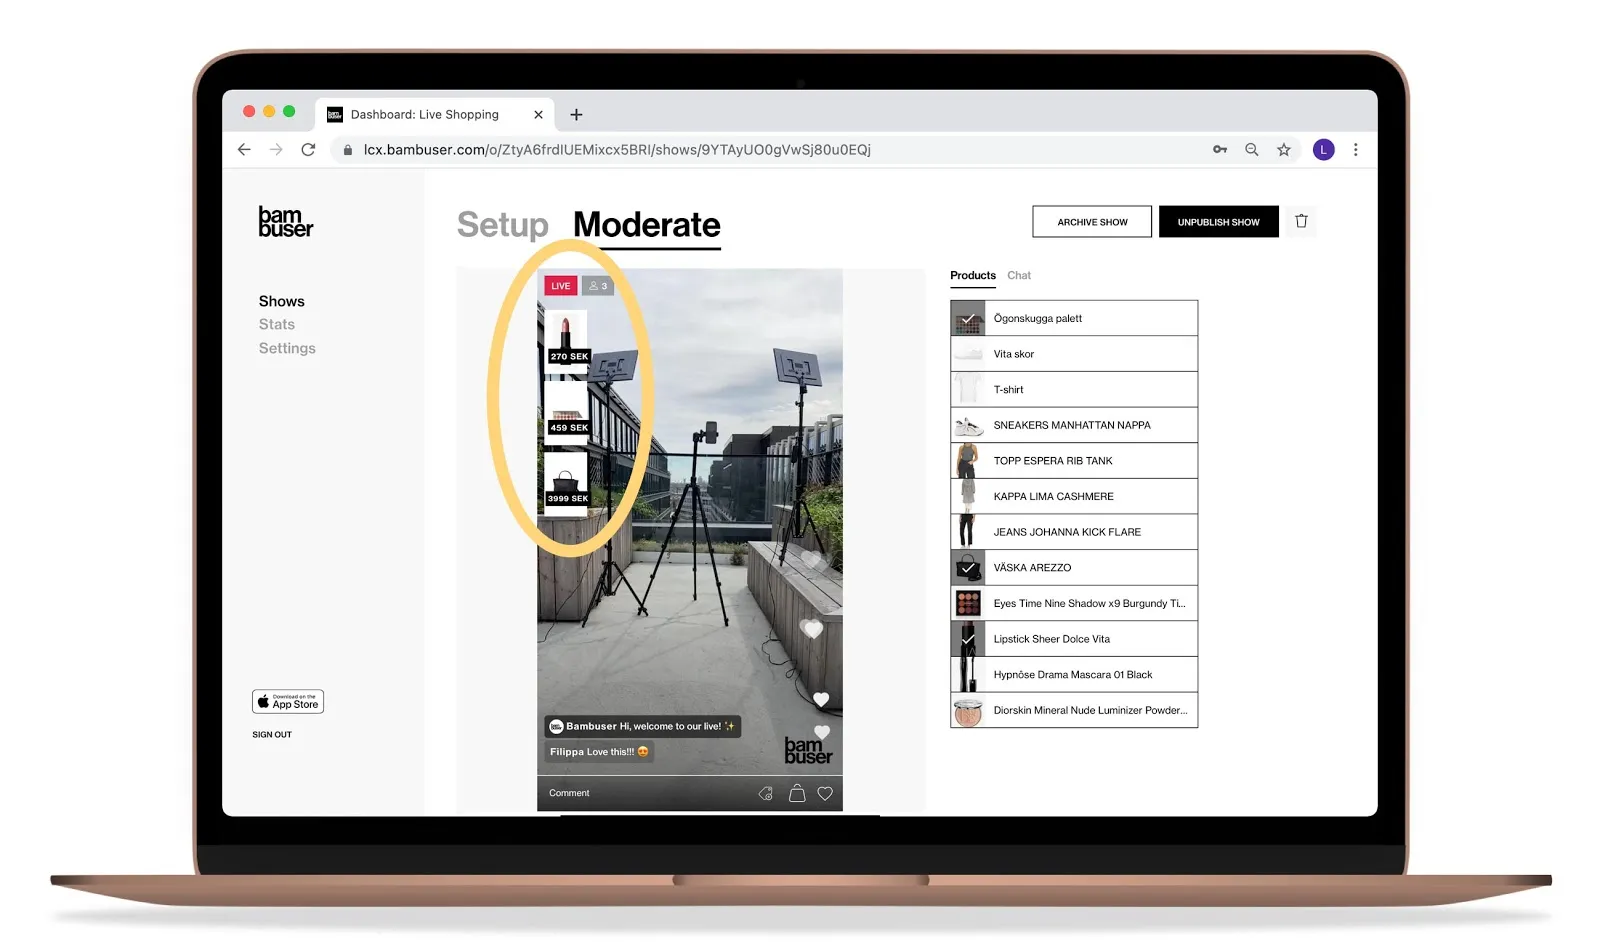
During the broadcast, you have the option to highlight specific products on the screen. Product highlights are managed through the Bambuser dashboard.
To highlight products:
1. Click the Moderate tab on top.
2. Select the Products tab on the right.
3. Click on the product you want to highlight.
4. Un-click the product to remove the highlight.
You can highlight a maximum of three products at the same time.
Measure the results
To see the stats for your live shows:
- From the Bambuser dashboard, click on the Stats tab on the left of the screen.
- Click on the show for which you want to see the stats.
From here, you can scroll through to read the stats and/or export the stats to a .csv document.
NOTE: It can take up to 30 minutes after your stream ends for all of the statistics to become available.
Broadcast Report
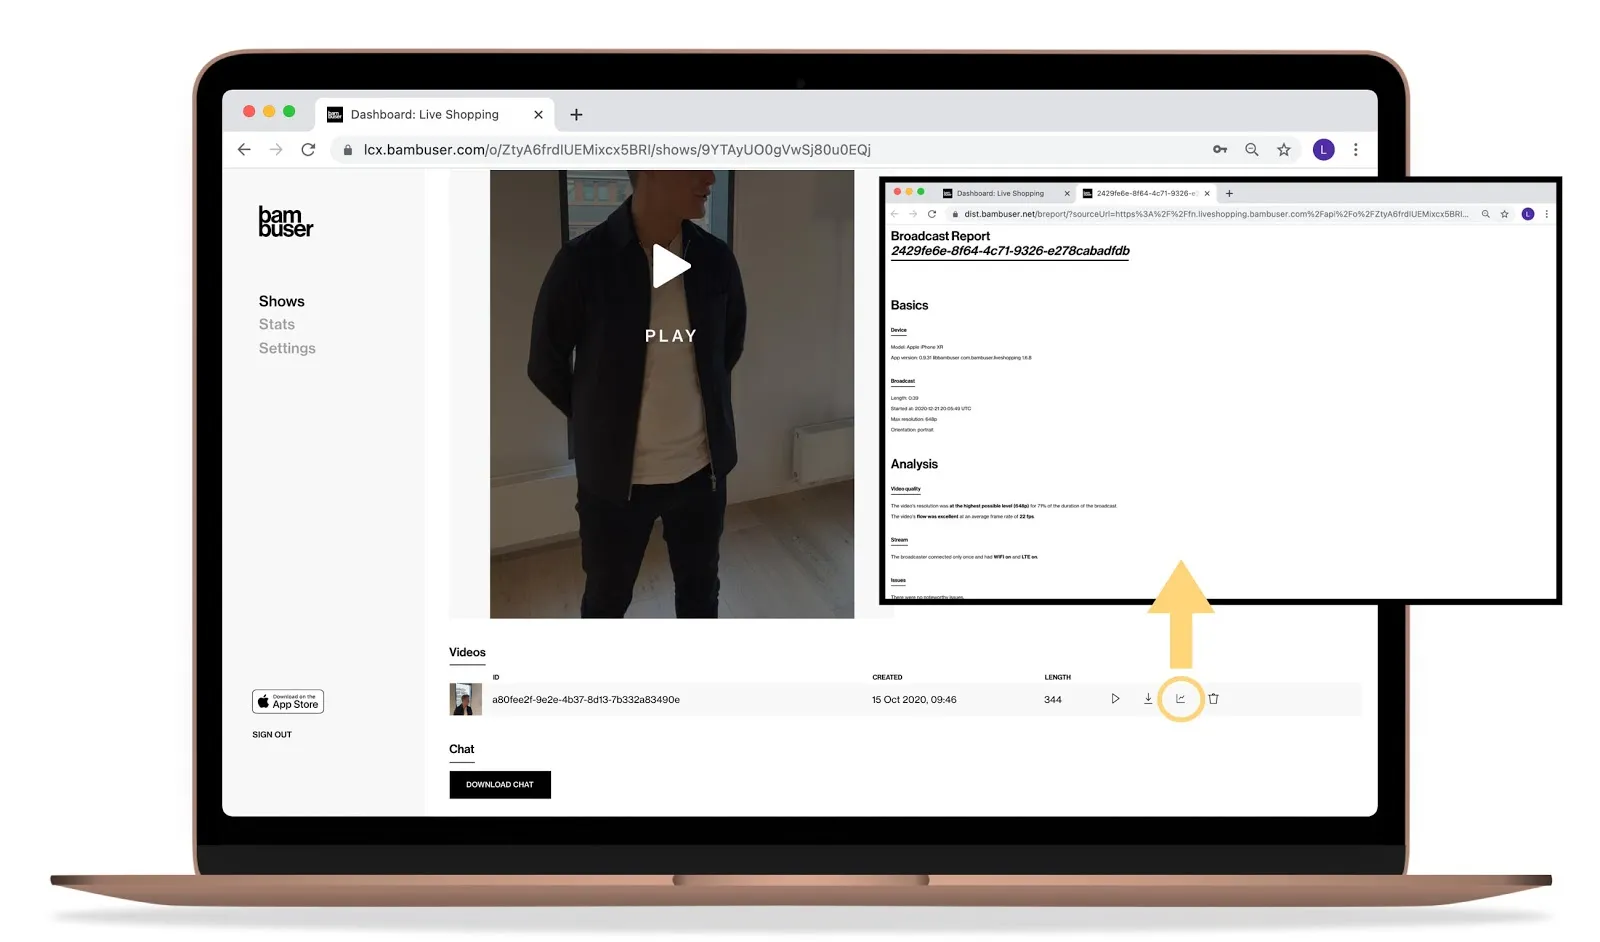
After your live show has ended, you will be able to load a report highlighting the broadcast's technical performance. We call this the Broadcast Report.
To access the Broadcast Report from the Bambuser dashboard:
- From the Shows tab, click on the show you want to analyze.
- Click on the Moderate tab.
- Scroll down to the bottom of the page and click on the "chart" icon. The Broadcast Report will open in a new tab.
How to read the Broadcast Report
- Device gives you details on the device used to host the live broadcast (both the hardware and software).
- Broadcast gives you details on the broadcast itself: length of the broadcast, max resolution, orientation.
- Video quality lets you know how good the video was during the broadcast.
- Stream explains the conditions for streaming.
- Issues are a list of any problems with the stream, such as a bad network connection.
- Incoming data rate shows how much video and audio data was received from the broadcaster: Reduced data transfer can lead to low video quality.
- Received video quality gives you an indication of how the video quality was for the viewer.
- Server health shows you how stable your connection was during the stream. If your network is stable, the resolution axis will be a straight line. The frame rate will fluctuate slightly even on stable networks, but anything over 20 fps is excellent.

